As we enter the final four weeks of our summer course (where, exactly, did the summer go?!), we are starting the first half of the Aequus Anima rider’s sequence. The poses below are selected from the first 10 poses of the 20 pose sequence, and can be practiced as a shorter series in and of themselves.
Warm up however you prefer to do so, whether cat/cow, rag doll rollup, or sun salutes.
Anjaneyasana|Low lunge, with arms up and side stretch as option. While bending the front knee well, imagine drawing back thigh bone backwards (two contrasting and balancing energies).
Press top of back foot into ground, and imagine drawing front foot back to stabilize pose. Pad under back knee if needed, and place block under lowered hand if need be.
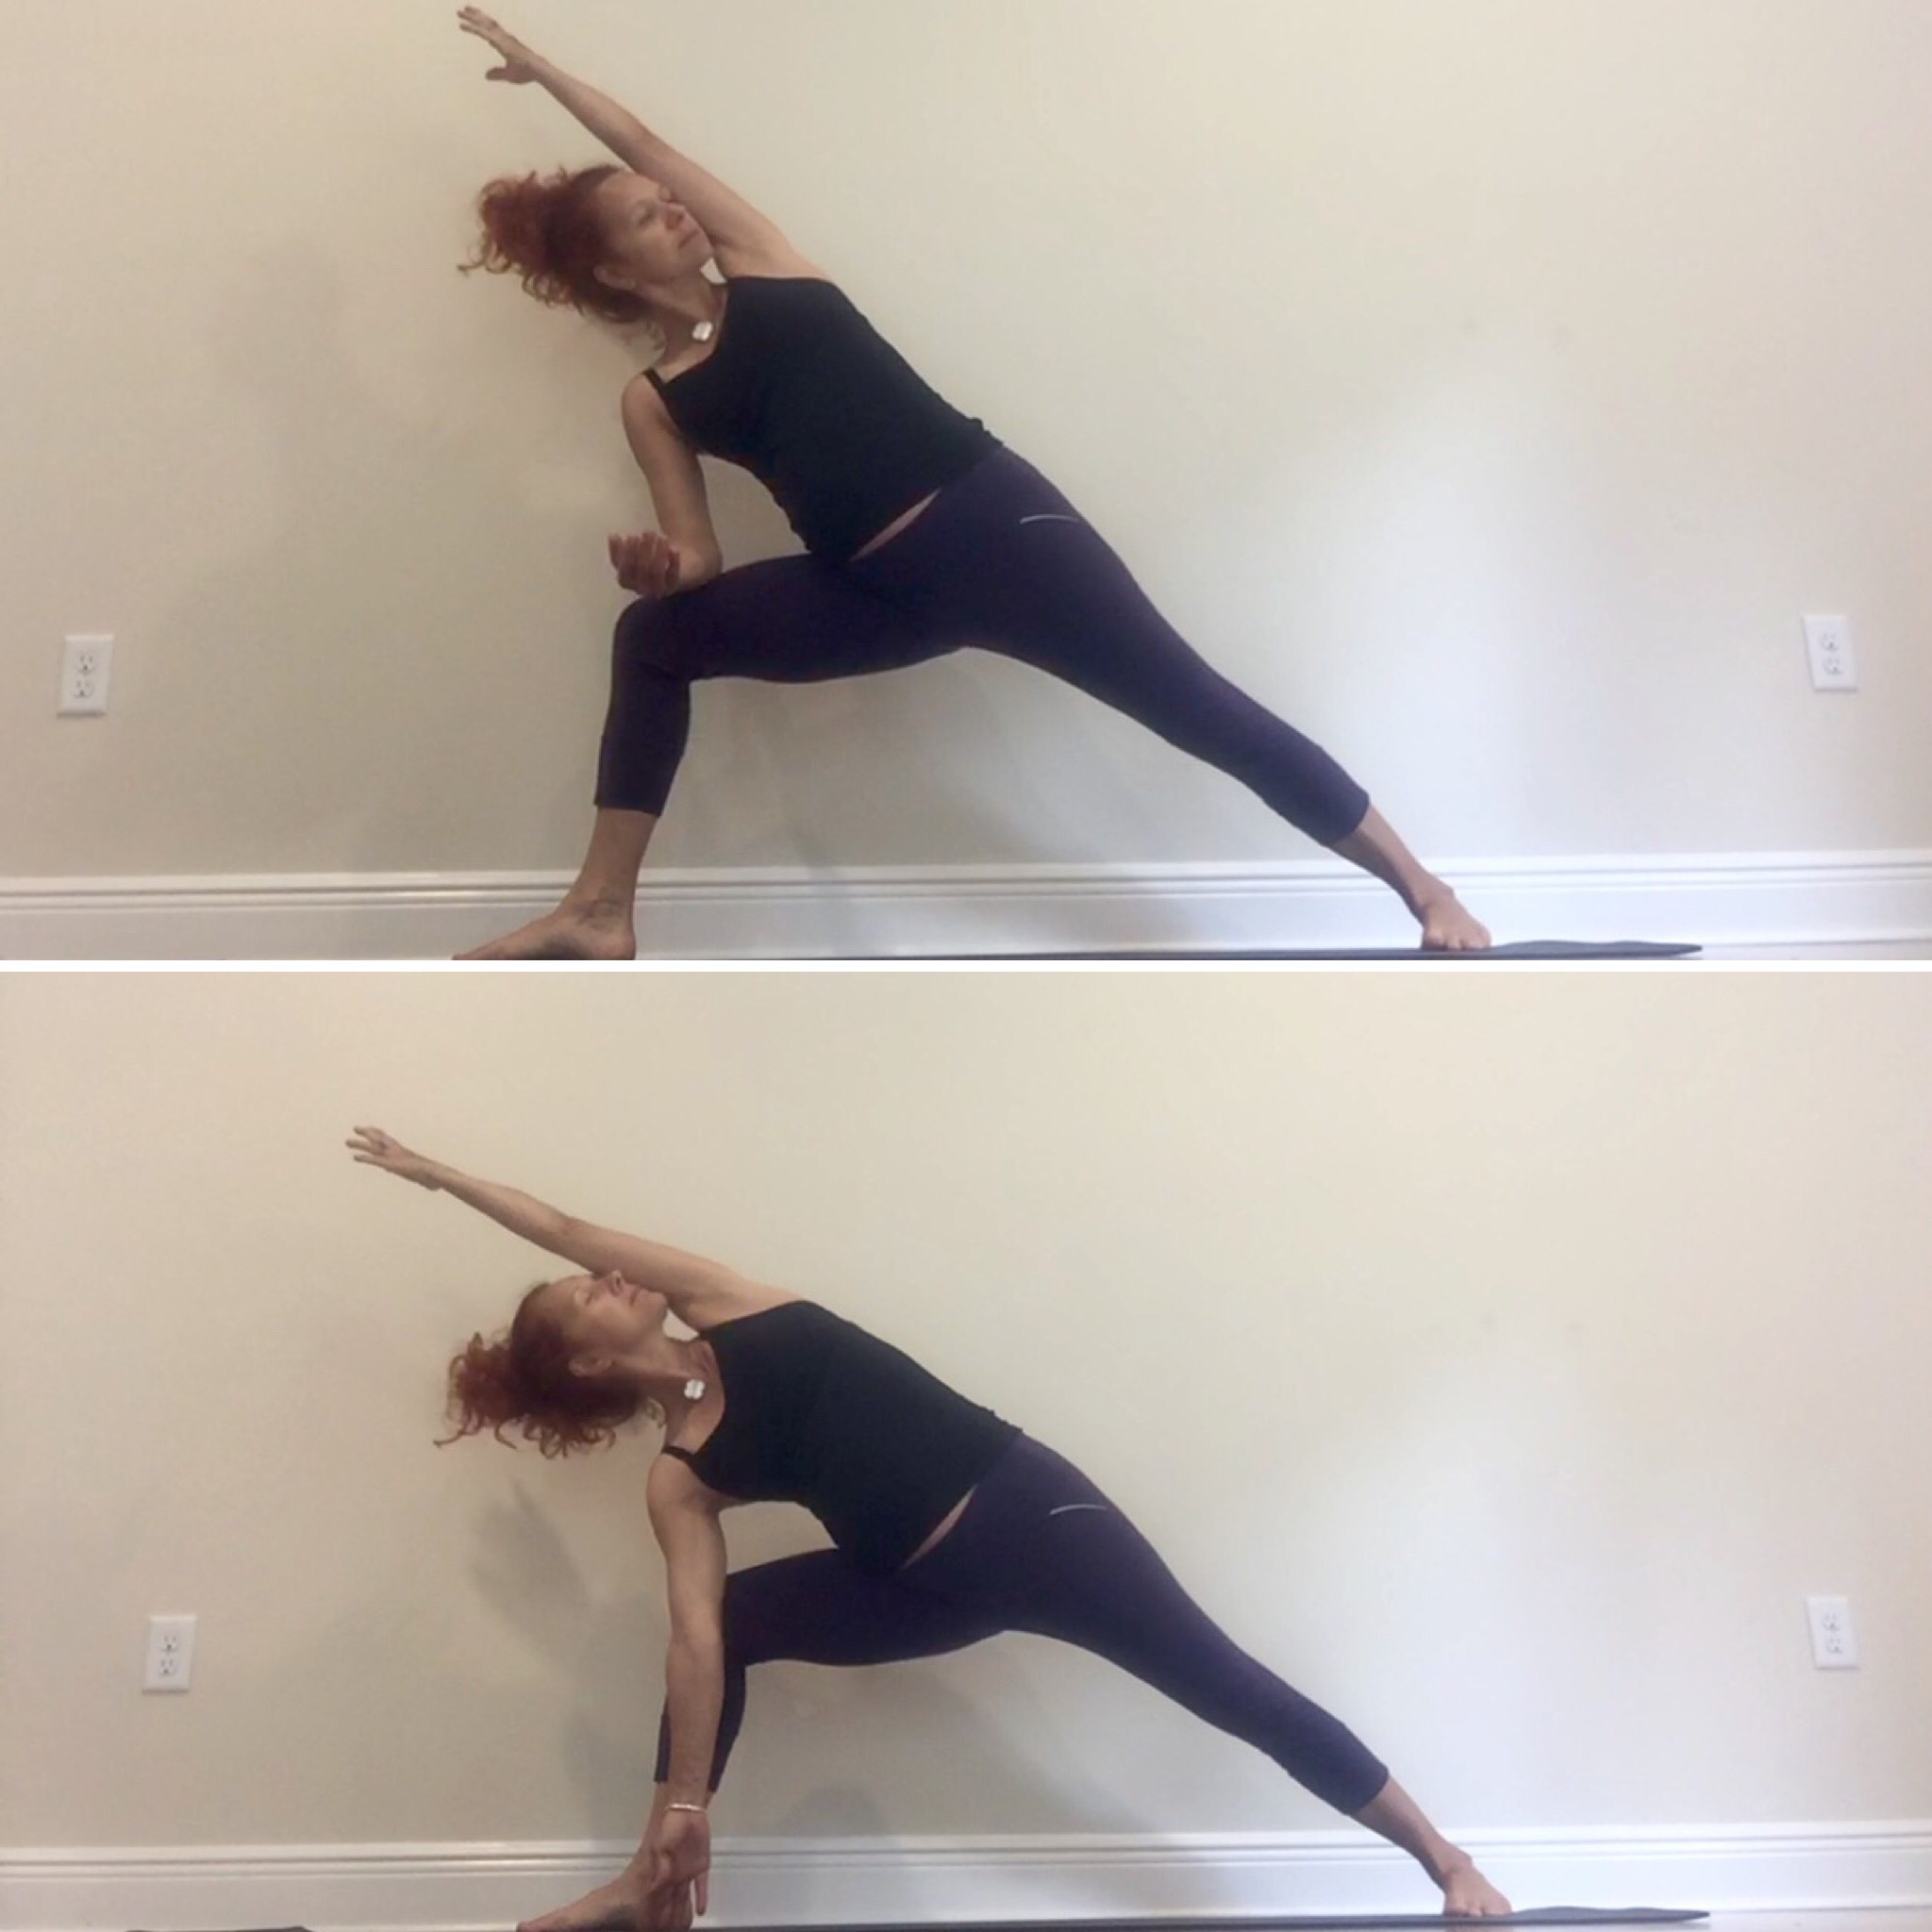
Utthita parsvakonasana | Extended side angle: Feel the entire side of the body extend, even as you rotate the sternum up towards the ceiling. You may keep the bottom arm on the thigh, as in the top photo below, or place it on a block or floor on the big toe side of the foot, as in the bottom photo below.
Press into outside of back foot well, and be sure to keep the bottom seat bone in line with front knee, rather than jutting out behind you.
Utthita trikonasana | Triangle pose: Second toe, knee and hip of front leg are all lined up with each other. This is an open twist, so be sure to allow for that movement in the spine.
Ensure that knee of front leg is well lined up with second toe of front foot. Imagine that you are pulling the mat longer with your feet. As in extended side angle pose, hip is in line with front leg, not jutting out behind.
Parsvottanasana preparation | Intense side stretch preparation: Keep spine extended over the front leg. Place blocks under hands if you need to curl the spine to reach the floor (or if you cannot reach the floor at all). Hips remain even, with hip of front leg drawing back and up, and hip of back leg drawing forward and down.
Line up front foot and back heel, pressing into big toe in front and heel in back.
Parsvottanasana | Intense side stretch pose: Place hands into reverse namaste behind the back, or simply take a hold of the opposite elbows behind your back. Like the preparatory pose above, the full pose requires good balance, achieved by pressing the front big toe and back heel into the ground. Spine extends above the front leg.
Keep extending spine – arms/hands remind one not to slouch!
End your practice with any pose that your body is requesting, whether bolster behind mid-spine, or a savasana with bolster down the length of the spine. Be sure to give yourself time to absorb the pose in final relaxation.
There are few people who haven’t experienced lower back discomfort, if not downright pain, at some point of their lives. Humans simply aren’t built very well! The places where the spine changes its curvature – the cervical (neck) to thoracic (upper back) vertebrae, the thoracic to lumbar (lower back) vertebrae – tend to be our problem areas. Often, the neck and lower back will reflect each other’s level of ease, or lack thereof. The abdominals, especially the transversus abdominis, are also involved in keeping the back healthy, for when they are weak, the lower back muscles have to take on more than their fair share of work.
This week’s practice focuses on what to do to release the lower back. Since the hips and lower back are intimately connected, as we learned while exploring the psoas and piriformis during the hips practice (password: “sleepy”), you’ll find we revisit several of our hip asanas again. Practice on for a lower back easing restorative session!
—–
Windshield wipers: Start lying back in constructive rest, and windshield wiper your knees slowly side to side to warm up your lower back.
Block under sacrum: From constructive rest, push your knees forward, which will pull the hips off the ground, and place a block under your sacrum. Use the height of block appropriate for your practice that day. Relax your hips completely onto the block and feel the delicious stretch through the lower back. If you’d like to add a little extra stretch, touch your knees together without moving the feet (you can lift the heels, though). When coming down, remove the block and lay down the vertebrae one at a time, starting at the top of the spine.
Feet remain hip width apart and parallel. Sternum is lifted.
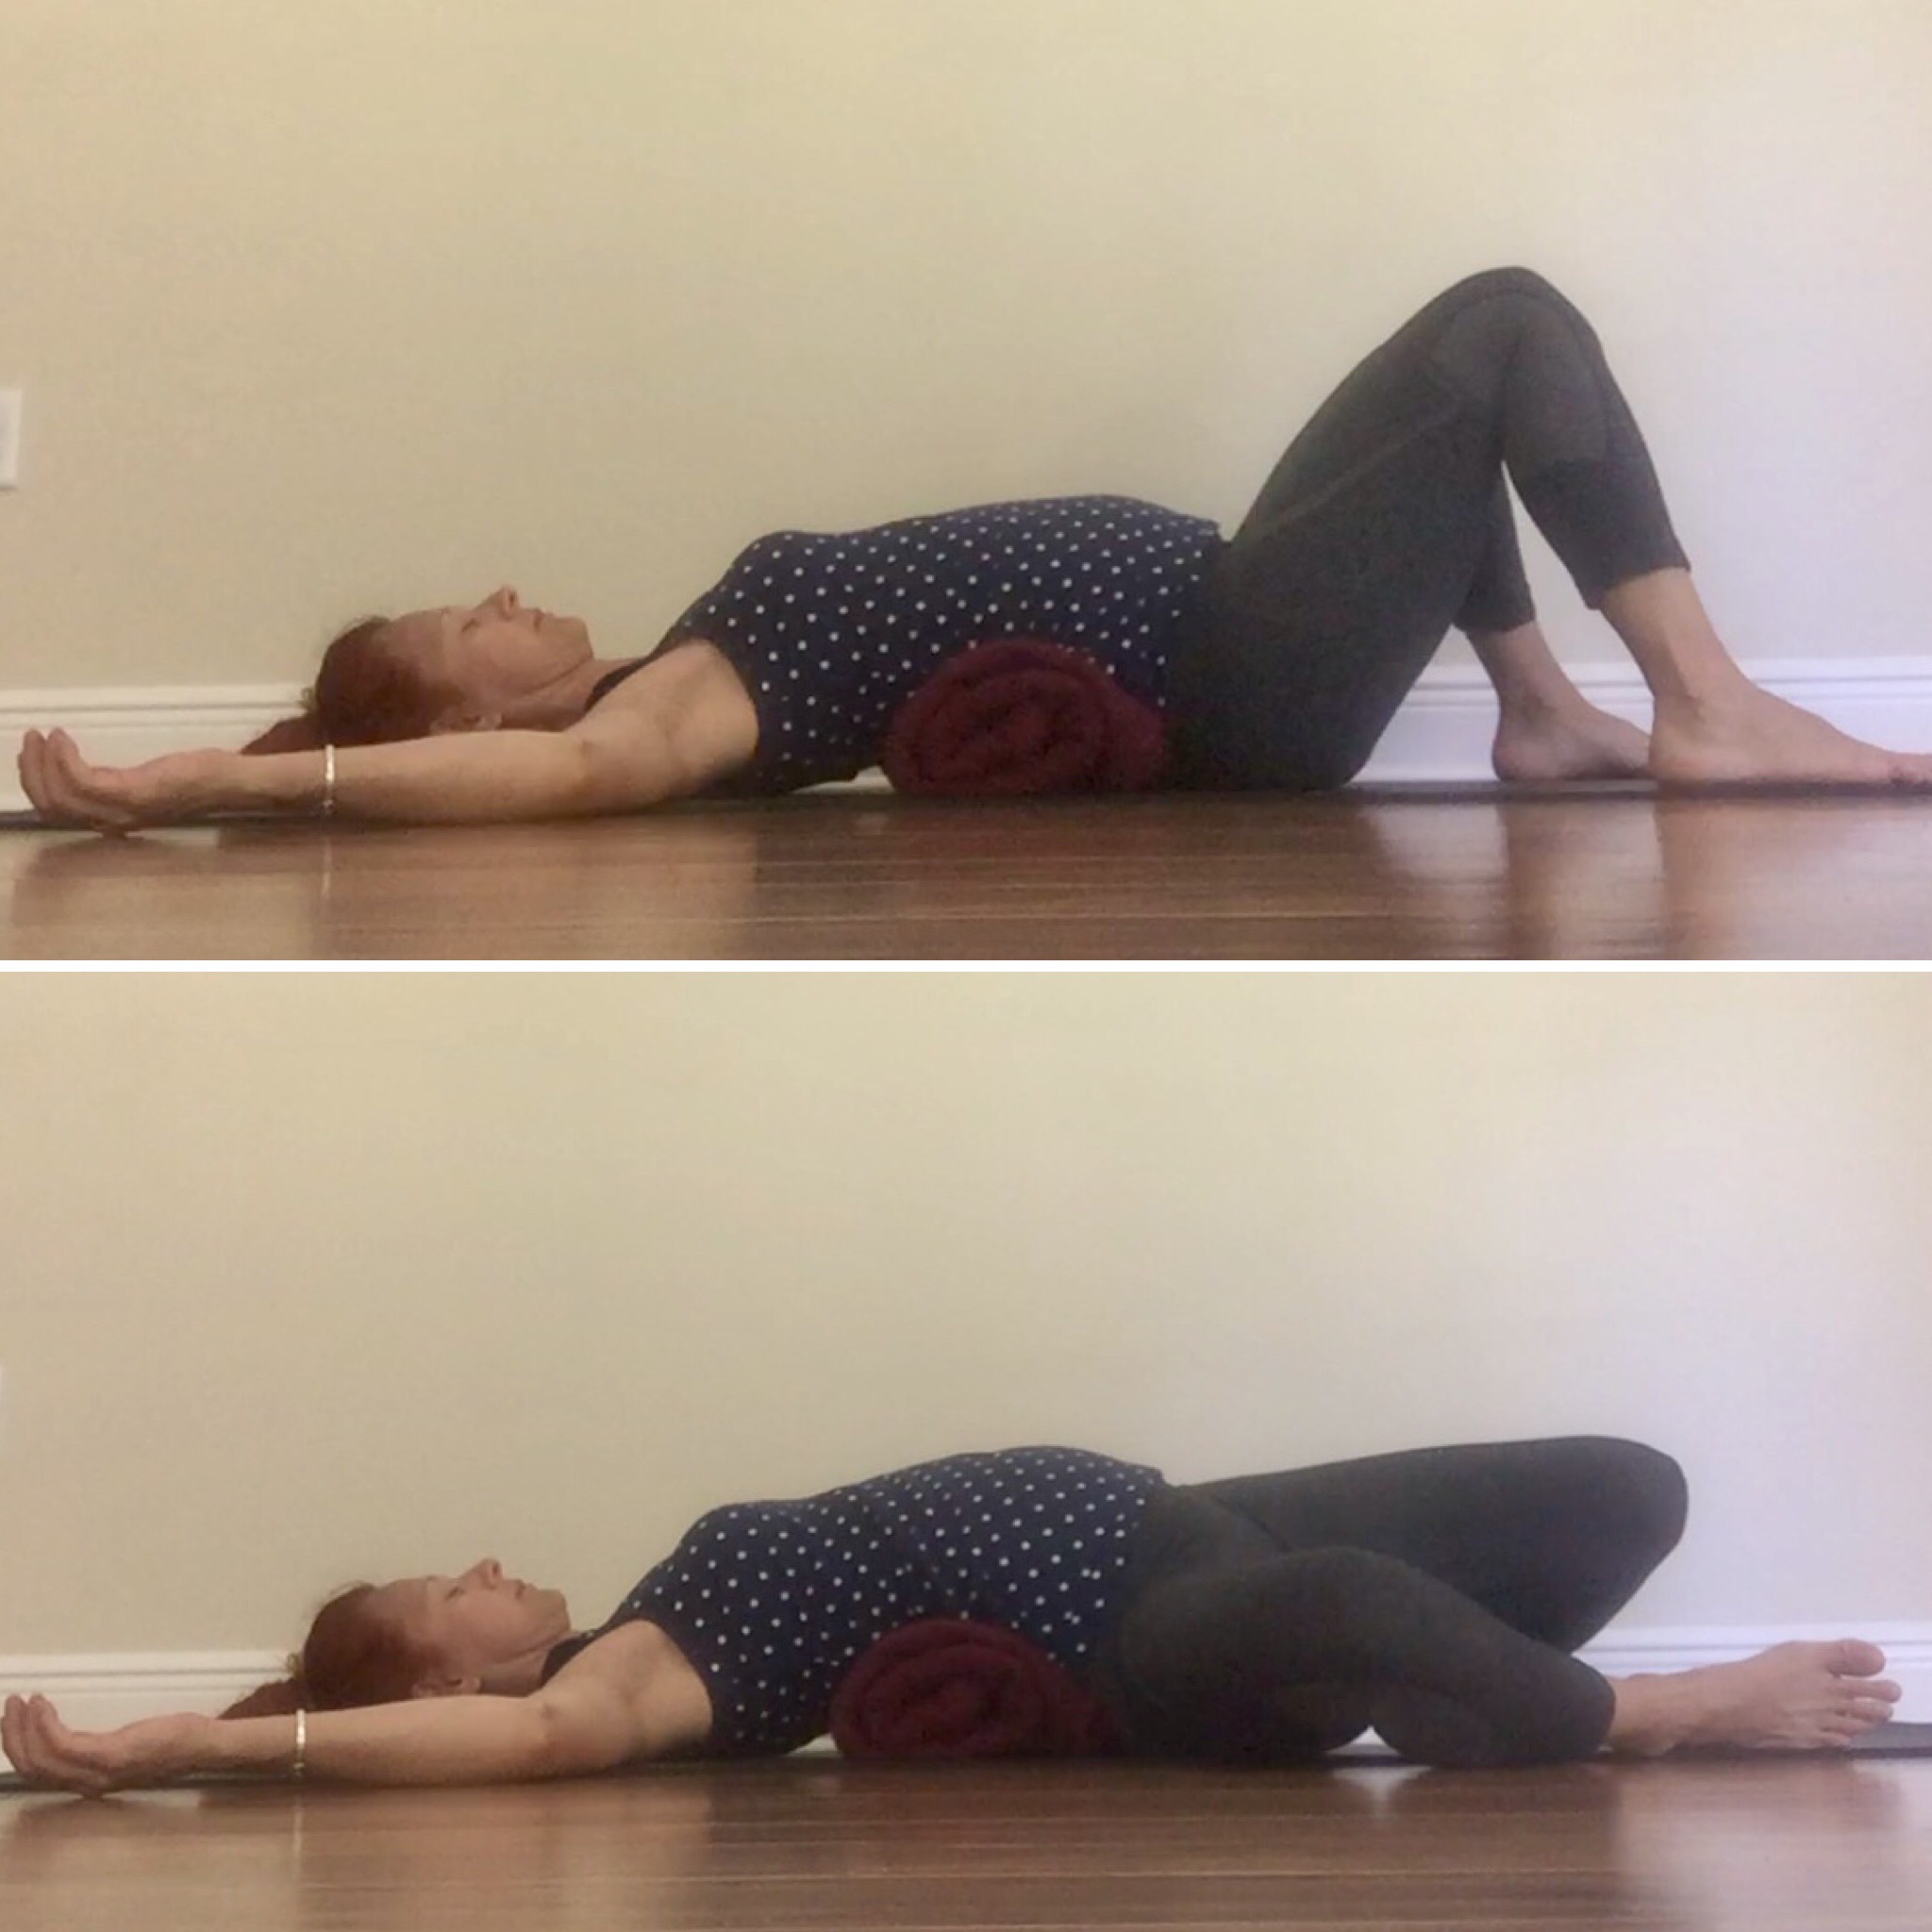
Lower back bolster: Roll up a blanket bolster and place it behind you. Lie down, with the bolster nestled into your lower back. Your hips might not touch the ground – don’t force them down, but do allow the spine to melt over the bolster. Windshield wiper the knees from side to side, again without moving the feet.
Relax spine like a wet noodle over bolster.
Side bolster twist: Roll onto your side while still on the bolster, and nestle it in the soft space between your hip and lower ribs. You might want to move the bolster around a bit unit it feels comfortable. Tuck your knees up, place the foot of the top leg above the knee of the bottom leg, and encourage the upper thigh to roll out. Then reach the upper arm up and out while rolling onto your shoulder blades. (Caution: if your piriformis is extremely tight, this asana might provide too much stretch; begin with thread the needle instead.)
Make sure that your outstretched hand does not drop lower than your shoulder (bottom photo). Place a block under the arm if your shoulder blade does not touch ground yet.
Salabhasana/locust: Lie on your belly, place your forehead on the ground arms next to you. Press the tops of the feet and ankles into the ground (ankles won’t touch, but just have the intention), and make the sacrum heavy; engage your abdominals while relaxing your glutes. Lift upper body (keep those glutes from engaging!) – you may leave the hands on the floor for assistance or lift them next to your body. This pose strengthens the back muscles, which is also important for keeping the lower back happy.
The photos below are from when I could still lie on my belly… 🙂 Sphinx pose (bottom photo) is also a good back muscle strengthener.
Salabhasana/Locust (variation) and Sphinx: both of these asana ask the mid-spine to extend. Keep neck long on both.
Janusirsasana/head to knee pose: Take a seat, stretch the legs out in front of you, then bend one foot in towards the other thigh. Hold the outside of the foot with the opposite hand, or use a belt. Twist slightly towards the leg, so that the spine and leg are lined up one on top of the other, then extend the spine, as you bring the belly to the thigh first, then the lower ribs, then chest, and finally head – this might be a multi-year process! Eventually, you may place the hands one on either side of the foot, as in the photos below.
Tip the pelvis forward in this asana, or place a blanket under your hips if that is a challenge.
Janusirsasana variation: Begin the same way as for janusirsasana, seated with legs in front, one bent. Take hold of extended foot with opposite hand, but instead of keeping the back straight and bringing the belly/lower ribs/chest/head to the leg, round the spine and pull away from the foot until you feel a lovely stretch through your entire back.
Draw abdominal muscles in to enhance this rounded back stretch.
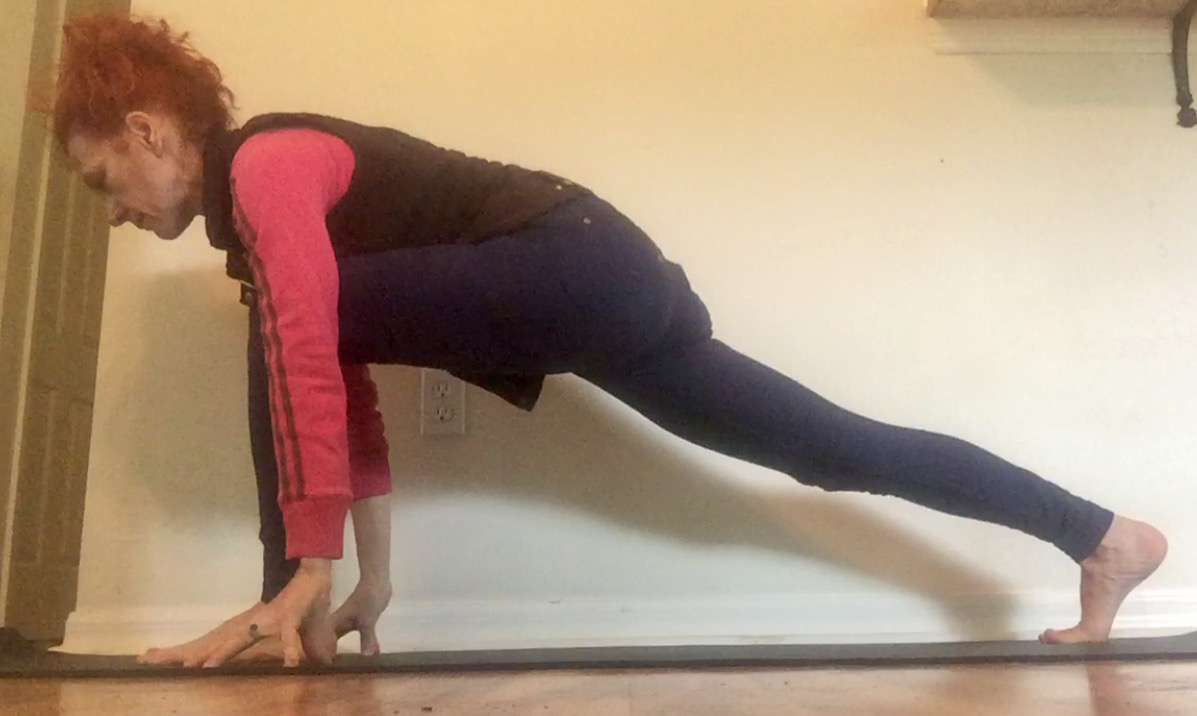
Uttanasana with back against wall: Stand in front of a wall, then take a forward fold. Walk in as close as your back allows, plant feet hip width apart and parallel, and lean into the wall while extending the spine. This is a fantastic pose if you can really let go and trust the the wall is going to hold you up!
Keep front of thighs engaged, heel firmly planted. Release into pose completely.
Simple one-legged twist: Lie back and cross one bent leg over the other straight leg. Keep shoulders down. Twist to the point where that the asana feels good for you. Relax muscles lining the spine and breathe well.
Keep knee bent, or straighten leg for additional twist and stretch.
Finish with savasana and enjoy the after effects of a happy lower back! 🙂
If I ask a yoga class of riders on what they’d like to focus, inevitably most people say “hips and shoulders.” Most riders recognize that we tend to hold tightness and tension in these two areas, and that we need to do something about it to ride and connect with our horses well. Hence, last week’s practices addressed the shoulders, and this week’s practices focus on the hips.
The two main muscles on which we are focusing are the psoas and the piriformis (the “terrible p’s”), which need to be both supple and strong for us to ride well. The psoas is a deep hip flexor, bringing the knee up, while the psoas is an external leg rotator, turning the leg out (both of these muscles work along with other hip muscles, of course, and have additional roles, but these are the most important and basic). For more details about the role of the psoas in riding, refer to this post from July 2017.
After mentally taking some moments to transition into practice, begin with high lunge, moving into low lunge:
Anjaneyasana – high lunge. Keep energy flowing freely down back leg by lifting it up from inner thigh.Anjaneyasana – low lunge: Arms can be raised above shoulders for additional stretching of hip flexors. Press top of back foot into ground for stability; pad under back knee with blanket if uncomfortable.
Thursday only: claps the hands behind you and lift the sternum into a backbend.
Be sure to press top of back foot into ground, and imagine that you are drawing front foot backwards (although it doesn’t move). Engage core, and lift heart. You need not take head back, only if that is comfortable on your neck.
Low lunge with side stretch: place a block under the lower hand if stretching all the way to the floor is too far for you at this stage (this photo is from our yoga for riders e-book)
Virabhadrasana I/Warrior I pose: Feel the grounding of the pose through the feet, yet the uplift of energy through the upper body. Refer to second set of photos below for a reminder about knee alignment. Thursday only: Humble warrior (right side of photo below).
Square the hips towards the front of your mat while keeping pinky side of back foot, along with hell, well grounded. Imagine that you are stretching the mat long between your feet.Virabhadrasana I/Warrior I leg alignment – be mindful of keeping the knee in line with the second toe of the foot
Virabhadrasana II/Warrior II pose: Grounded through feet, light with upper body. Note alignment of knee in second photograph below.
Hips open to side of mat – think of external rotation of the thing bones, while dropping tail towards floor, but not tucking. Imagine stretching the mat long between feet. Keep shoulders relaxed.
Thursday only: repeat last week’s bound extended side angle pose.
Bring the head in line over the front foot – this will automatically align the hips. Keep heel of straight leg well grounded.
Warrior II leg alignment – it is especially easy for the knee to fall over the big toe or even further in here; think about rotating the thigh bone out towards the pinky toe.Thursday only: Half pigeon pose, then bend back leg (optional)
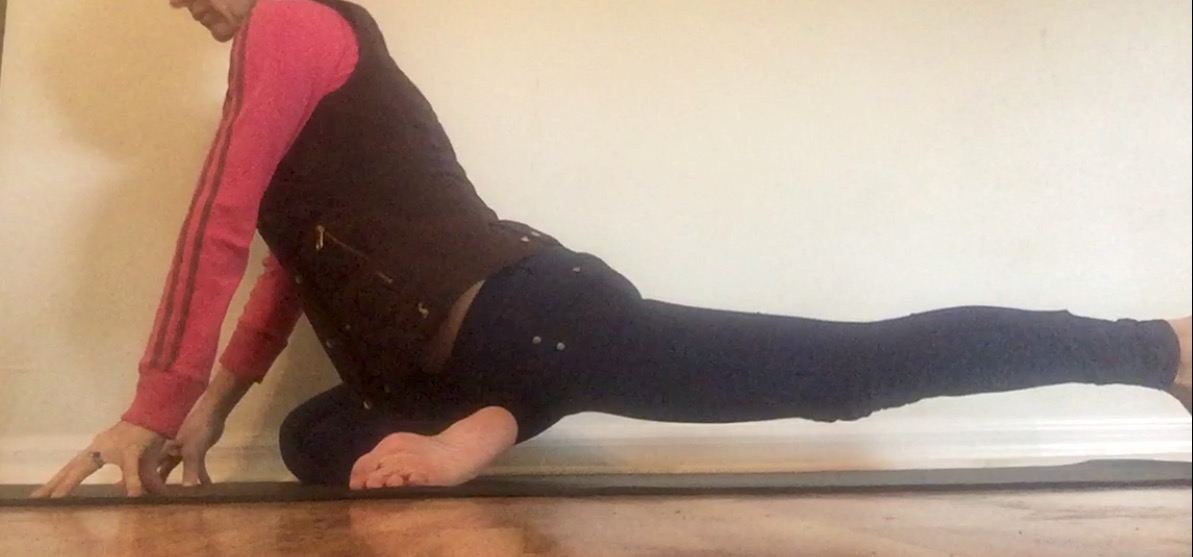
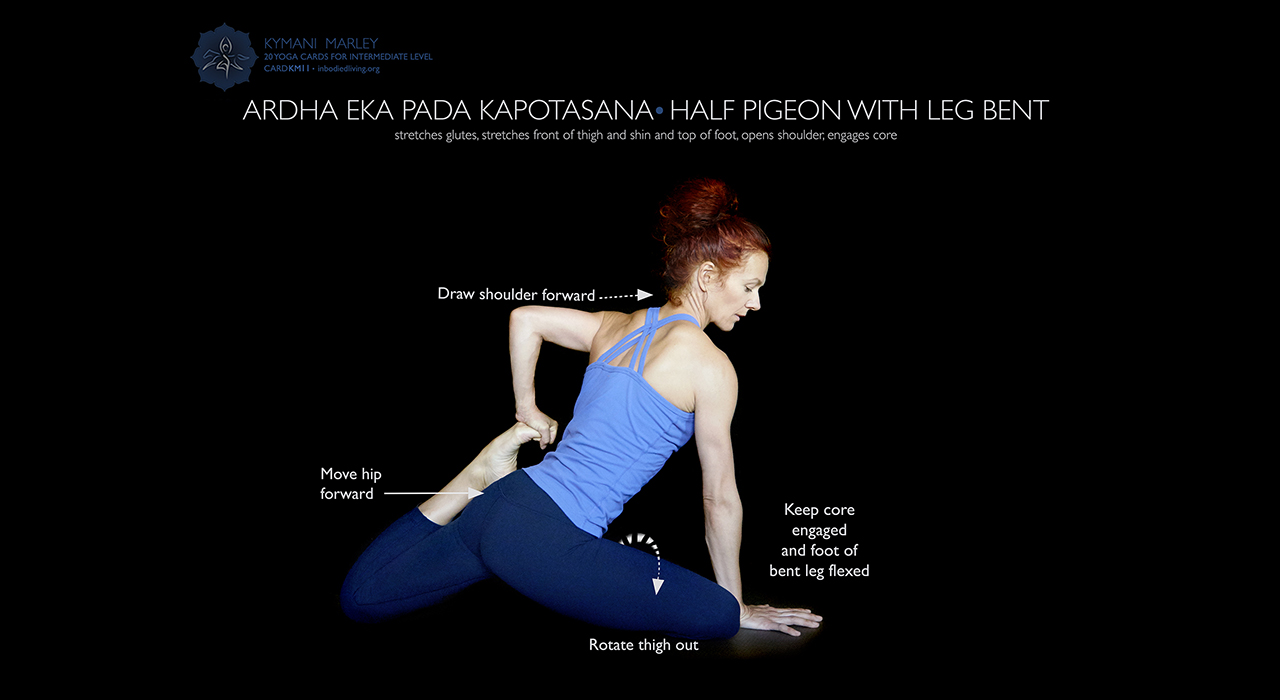
Flex the foot of the bent leg, and place the bent knee far to the right (if right leg bent). Keep the weight evenly distributed on both hips.Half pigeon pose extending forward: Keep the front of the body longFor a bigger stretch of the hip flexors and front of the thighs, draw hip of back leg forward.
Upavista konasana/Seated wide legged forward fold: Keep knees and toes pointing straight up towards ceiling, even as you move deeper into the pose.
Upavistha konasana/Wide legged forward fold: Front of spine remains long. If you find your pelvis in a posterior tilt (tuck), place a folded blanket under the seat to help you find a more neutral pelvic alignment.
Side twist with bolster: Tuesday class, we did not get to this, but feel free to practice this pose as well if you are familiar with it. If not, we will return to it again in a future class.
Ensure bolster is placed comfortably under side. Release into the pose – no effort.
A previous post examined the role of the psoas in riding, noting the importance of stretching and toning these deep hip muscles.
While there are many poses that can be used to stretch the psoas, here are three of my favorites, with annotations on how to find correct alignment and direct your energy. They are part of our rider’s yoga sequence, Aequus Anima: Yoga Between Effort and Ease, which can be purchased as a digital download via Payhip, and is also available for Amazon’s Kindle. (The Payhip download is a PDF of 20 yoga poses, designed so that one can flip from one pose to the next one in the sequence on an iPad or computer, and one can also enlarge the image if needed, plus print the photos on a home printer.)
Please note: While these poses are appropriate for many people, they might not be beneficial, or even accessible, for everyone. For example, if your hips are very tight, you have knee problems, or you have had injuries to the muscles being stretched or the joints involved, please do not attempt the poses without the help of a qualified yoga teacher.
For those who do have any of these conditions and would like to have a private consultation with me via telephone or Skype, please contact me by emailing sylvia [at] inbodiedliving.org. I will be happy to advise you on modifications or alternate poses. Consultations followed by a personalized practice of 3-5 poses consisting of photographs with annotations (see example at the end of this post) start at $80/session.
Example of personalized practice pose (not for the psoas :):
You have two of them, and you use them every day. Yet, do you know where the psoas muscles are located? And why can knowing more about these muscles with a funny name help you become a better rider? There are (at least) two reasons that the psoas are important for riders: 1. they help one follow the movement of the horse and to give weight, seat and leg aids, and 2. they contract when one feels stressed, and riders need to be able to relax them consciously to not communicate tension to the horse.
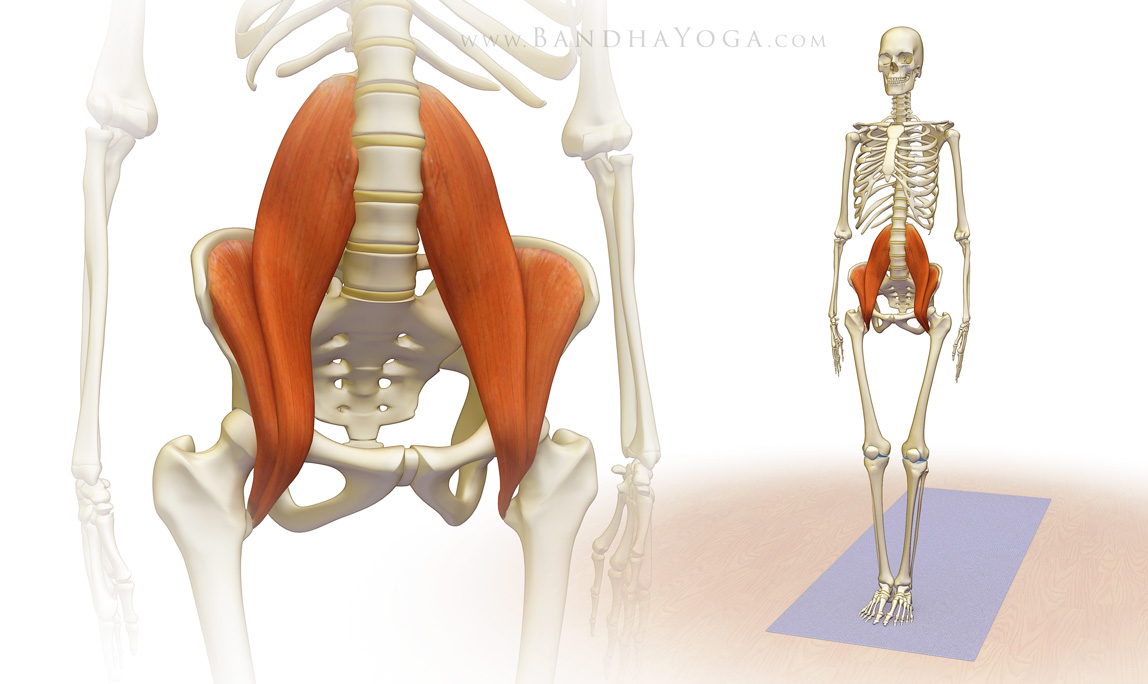
Where are the psoas?
The psoas muscles connect the spine and upper leg, via the hip. They are attached to the front of several vertebrae in the lower back (lumbar spine), then wind their way to the front of the pelvis, there joined by the iliac muscles, which originate on the insides of the pelvic bowl, ending at the upper inside of the thigh bone (the lesser trochanter of the femur).
The psoas muscles need to primarily lengthen when riding with a longer leg during dressage, and need to rapidly and responsively shorten and lengthen when closing and opening the angle of the hip while jumping.
Dressage riders need to subtly control the movement of the leg, even as it hangs long.
The yellow line indicates the shoulder-hip-ankle alignment. The blue line indicates a relaxed and long psoas that is not pulling on the spine or thigh bone. Note that this sensitive mare’s back is raised, neck is long and head is low, accepting contact happily.
If the psoas is tight, the moment the rider drops the leg, the shortened psoas will pull the lower back forward into a “lordosis,” or overarching of the lower back, leading to compression of the vertebrae and, over time, damage to the intervertebral discs.
Here a tight psoas (blue arrow) is pulling the lower back forward and down. With the back braced in this way, the rider has no choice but to push the chest out and to grip with the buttock muscles and lower leg (red arrow), which is too far back, to counterbalance the rest of the body.
More commonly, tight psoas muscles will pull the legs forward and up, leading to a chair seat, which unbalances both rider and horse.
Chair seat – a very common misalignment. The tight psoas (blue arrow) pulls up on the thigh bone, which pulls the lower leg forward (red arrow); the rider tries to balance this by leaning back. Note that the mare does not like this misaligned pressure on the long back muscles that line either side of the spine – her head is up and back is tense.
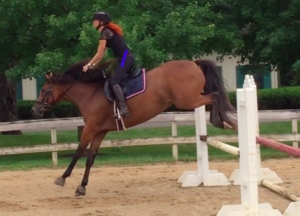
A jumper rider’s psoas muscles need to be very responsive to the changing position of a balanced rider as s/he follows the movement of the horse over a jump, shortening, lengthening, then shortening again very quickly – see photos below, and take particular note of the opening and closing of the rider’s hip angle as she follows the movement of the jumping horse. The psoas muscles can become very tight, since they are contracted most of the time in a two-point seat, and this tightness not only limits the rider’s ability to follow the movement of the horse, but often also contributes to a sore and strained lower back.
Psoas muscles are medium contracted (blue line)Psoas at their greatest contraction (blue line)Psoas lengthen (blue line) as angle of rider’s hip accommodates movement of the mare’s body as she is preparing to land.Psoas at their longest (blue line) as the rider is almost standing vertically while balancing over the mare’s center of gravity as she lands.
The role of the psoas as “emotional muscles:”
The psoas muscles are engaged when one is running or kicking, bringing the knees up in both actions, and are activated during the flight or fight response. Because of their role in avoiding or counteracting danger, the psoas are “emotional muscles,” meaning that they involuntarily contract when we feel under stress. Most of the contemporary stress we face is not life threatening, yet our bodies evolved to help us either get away or fight off a threat, and these same bodies haven’t quite caught up to the world of mental stress in which we find ourselves now; thus, our psoas muscles tend to continually be tensed. There is always the possibility of falling off when one is riding, and if one is at all nervous, the psoas will involuntarily tighten, causing the rider to curl into a fetal position. A sensitive horse feels this muscle movement and fearful energy, and, taking his cue from the rider, will become anxious, leading to a downward spiral that might end in a bucking horse and a panicked rider that is now sure to be ejected from the saddle.
The rider’s psoas tightens (blue arrow) in response to fear, and pulls the body towards a fetal position (red arrows), usually accompanied by the rider holding onto the horse’s mouth to try and stay on board (we will not go so far as to demonstrate the bucking horse scenario…).
The tyranny of the modern lifestyle on the psoas:
Unfortunately, most of us, even those of us that are quite active, sit in chairs and cars for hours every day. Coupled with daily stress (see above), this position causes the psoas to shorten, eventually leading to chronically short, tight and unresponsive muscles. What makes matters more challenging is that the right and left psoas muscles are likely to be different in their level of tightness, leading to different level of pulling on the power spine, and possible hip misalignment. For example, most cars now have an automatic transmission, meaning that we only use our right leg to step on the break and gas – the psoas is one of the main muscles that lifts the leg up off the pedals; think about how often we repeat that action in a day – week – month…. Furthermore, how many riders mount their horses only from the left side? The effect on the horse aside (although, it is an important one), how does that affect musculature and coordination?
Part two of this series provides asanas (poses) for stretching and toning the psoas muscles.